> ## Documentation Index
> Fetch the complete documentation index at: https://docs.happycapy.ai/llms.txt
> Use this file to discover all available pages before exploring further.

# Publish & Remix

> Remix할 수 있는 Project 스냅샷을 게시해, 다른 사람이나 내가 새 Project로 복사해 사용할 수 있게 합니다.

export function LivePreview({url, label, linkLabel = "Open live result", fit = "content"}) {
  const isContentFit = fit === "content";
  return <div className={`hc-live-preview${isContentFit ? " hc-preview-content" : ""}`} style={{
    width: isContentFit ? "100%" : "clamp(320px, calc(100vw - 640px), 960px)",
    margin: isContentFit ? "18px 0 32px" : "18px 0 32px 50%",
    transform: isContentFit ? "none" : "translateX(-50%)",
    border: "1px solid rgba(46, 41, 41, 0.1)",
    borderRadius: "10px",
    overflow: "hidden",
    background: "rgba(255, 255, 255, 0.55)",
    boxShadow: "0 18px 45px rgba(46, 41, 41, 0.08)"
  }}>
      <style>{`
        .hc-live-preview-clip {
          position: relative;
          container-type: inline-size;
          aspect-ratio: 16 / 10;
          height: auto;
          overflow: hidden;
          background: white;
        }

        .hc-live-preview-frame {
          position: absolute;
          left: 0;
          top: 0;
          width: 1280px !important;
          height: 800px !important;
          max-width: none !important;
          border: 0;
          background: white;
          display: block;
          transform: scale(calc(100cqw / 1280px));
          transform-origin: top left;
        }

        @media (max-width: 1279px) {
          .hc-live-preview:not(.hc-preview-content) {
            width: 100% !important;
            margin-left: 0 !important;
            transform: none !important;
          }

          .hc-live-preview:not(.hc-preview-content) .hc-live-preview-clip {
            height: min(70vh, 520px);
          }

          .hc-live-preview:not(.hc-preview-content) .hc-live-preview-frame {
            width: 100%;
            height: 100%;
            transform: none;
          }
        }
      `}</style>
      <div style={{
    display: "flex",
    alignItems: "center",
    gap: "8px",
    padding: "10px 12px",
    borderBottom: "1px solid rgba(46, 41, 41, 0.08)",
    background: "rgba(46, 41, 41, 0.035)"
  }}>
        <span style={{
    width: "8px",
    height: "8px",
    borderRadius: "999px",
    background: "#F8A963"
  }} />
        <span style={{
    width: "8px",
    height: "8px",
    borderRadius: "999px",
    background: "rgba(46, 41, 41, 0.18)"
  }} />
        <span style={{
    width: "8px",
    height: "8px",
    borderRadius: "999px",
    background: "rgba(46, 41, 41, 0.18)"
  }} />
        <span style={{
    marginLeft: "8px",
    color: "rgba(46, 41, 41, 0.58)",
    fontSize: "0.82rem",
    overflow: "hidden",
    textOverflow: "ellipsis",
    whiteSpace: "nowrap"
  }}>{label}</span>
      </div>
      <div className="hc-live-preview-clip">
        <iframe className="hc-live-preview-frame" src={url} title={label} loading="lazy" style={{
    margin: 0,
    maxWidth: "none"
  }} />
      </div>
      <div style={{
    padding: "12px 14px",
    borderTop: "1px solid rgba(46, 41, 41, 0.08)",
    background: "rgba(255, 255, 255, 0.72)"
  }}>
        <a href={url} target="_blank" rel="noreferrer">{linkLabel}</a>
      </div>
    </div>;
}

## Publish & Remix의 의미

대화, 파일, 결과를 보여주기만 하면 된다면 **Share**를 사용합니다.

다른 사람이 내 Project를 바탕으로 계속 편집하게 하려면 **Publish**를 사용합니다. Publish는 Remix할 수 있는 Project 스냅샷을 저장합니다. 링크가 있는 사람은 스냅샷을 볼 수 있고, **Remix**해서 자신의 편집 가능한 Project로 만들 수 있습니다.

**Remix**는 스냅샷에서 새 Project를 만듭니다. 이 복사본은 독립적이므로, Remix에서 바꾼 내용은 원래 Project에 영향을 주지 않습니다.

내가 게시한 스냅샷을 직접 Remix할 수도 있습니다. 안정된 버전에서 다른 방향을 시도하고 싶을 때 유용합니다.

## 언제 사용하나요

* 다른 사람이 내 Project를 편집하거나 변형하길 원할 때
* 다른 사람이 복사할 수 있는 안정된 버전을 남기고 싶을 때
* 현재 버전에서 다른 방향을 직접 탐색하고 싶을 때
* 팀이나 커뮤니티가 내 Project를 재사용하길 원할 때

<Note>
  게시된 링크를 가진 사람은 누구나 스냅샷을 볼 수 있습니다. 게시하기 전에 파일, 채팅 기록, 토큰, 시크릿, 개인 정보를 확인하세요.
</Note>

## 스냅샷 Publish하기

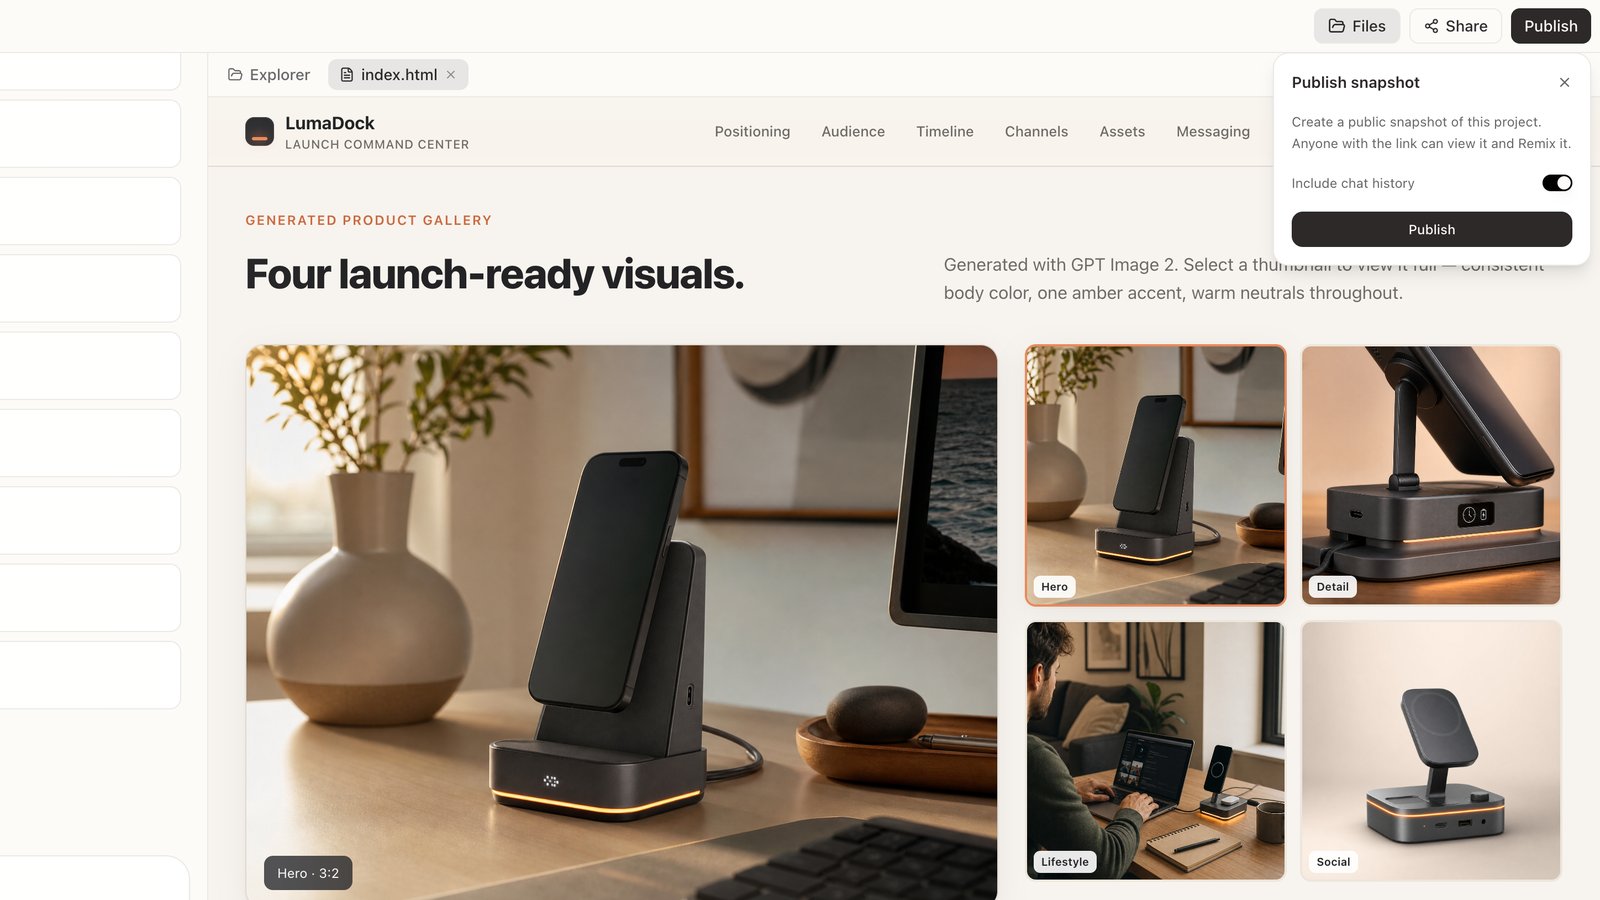
Project 오른쪽 위에서 **Publish**를 클릭합니다.

<div style={{ borderRadius: '14px', border: '1px solid rgba(45, 36, 27, 0.12)', boxShadow: '0 18px 46px rgba(56, 38, 20, 0.09)', overflow: 'hidden', background: '#FFFFFF', marginBottom: '24px' }}>
  <div style={{ padding: '12px 16px', borderBottom: '1px solid rgba(45, 36, 27, 0.08)', background: '#FFFFFF' }}>
    <span style={{ display: 'block', color: '#2E2929', fontFamily: 'Instrument Serif, Georgia, "Times New Roman", serif', fontSize: '28px', fontWeight: 400, lineHeight: '1' }}>Publish</span>
    <span style={{ display: 'block', marginTop: '6px', color: '#8A8178', fontFamily: 'Instrument Serif, Georgia, "Times New Roman", serif', fontSize: '18px', fontWeight: 400, lineHeight: '1.2' }}>Remix할 수 있는 Project 스냅샷을 저장합니다.</span>
  </div>

  <img src="https://mintcdn.com/happycapy/qu9DbeP3oO1Bbe3K/images/features/publish-snapshot.png?fit=max&auto=format&n=qu9DbeP3oO1Bbe3K&q=85&s=e295fcb80229d4704896f484304d4805" alt="Publish 스냅샷 패널" style={{ maxWidth: '100%', display: 'block', margin: '0 auto' }} width="1600" height="900" data-path="images/features/publish-snapshot.png" />
</div>

링크를 복사하기 전에 포함할 내용을 선택합니다.

* **Include chat history** — 대화 기록을 스냅샷에 포함합니다
* **Files only** — 채팅 기록을 끄고 Project 파일만 게시합니다
* **Past snapshots** — 이전에 게시한 링크를 찾아 다시 공유합니다

게시 후 링크를 복사해, 스냅샷을 보거나 Remix해야 하는 사람에게 보냅니다.

<Tip>
  스냅샷은 Publish한 순간의 Project 상태를 기록합니다. 이후 중요한 변경을 했다면 다시 Publish해서 새 버전을 공유하세요.
</Tip>

## 스냅샷 Remix하기

게시된 스냅샷을 열고 **Remix**를 클릭합니다.

<LivePreview url="https://happycapy.ai/snapshots/e4f0e3b2-a8c8-4c50-91df-0789f7017d37" label="happycapy.ai/snapshots/e4f0e3b2-a8c8-4c50-91df-0789f7017d37" linkLabel="스냅샷 열기" />

Happycapy는 스냅샷을 내 워크스페이스로 복사하고 새 Project로 엽니다. 그다음 파일을 수정하거나, 작업을 이어가거나, Happycapy에게 다른 방향으로 진행해 달라고 요청할 수 있습니다.

복사본은 독립적입니다.

* Remix에서 바꾼 내용은 원래 Project에 영향을 주지 않습니다
* 원래 Project의 변경 사항은 기존 Remix에 자동으로 반영되지 않습니다
* 여러 사람이 같은 스냅샷을 Remix하고 각자 따로 작업할 수 있습니다