> ## Documentation Index
> Fetch the complete documentation index at: https://docs.happycapy.ai/llms.txt
> Use this file to discover all available pages before exploring further.

# Video Generation

> Create short videos from prompts, images, or existing clips inside a Project

## What is Video Generation?

Video Generation lets you create short videos from text prompts, images, or existing video clips. Use it for social ads, product demos, storyboards, motion concepts, and campaign assets you want to keep with the rest of your Project files.

Start from the material you already have. Click **Generate Video** below the input box to enter video mode, then describe the clip you want. You can also ask for a video directly in your message. If a model matters, choose it from the video model menu or mention the model in your prompt; otherwise, describe the result and let Happycapy choose a suitable path.

## Three ways to start

Choose the input you already have: a prompt, one or more images, or an existing video.

### 1. Start from text

Describe the video you want. Include the subject, scene, motion, style, duration, aspect ratio, and where you plan to use it.

<div style={{ display: 'grid', gridTemplateColumns: 'repeat(auto-fit, minmax(250px, 1fr))', gap: '1rem', margin: '1rem 0 2rem' }}>
  <div style={{ gridColumn: '1 / -1', border: '1px solid rgba(46, 41, 41, 0.1)', borderRadius: '12px', overflow: 'hidden', background: '#fffdf9' }}>
    <div style={{ padding: '1.1rem' }}>
      <div style={{ fontSize: '0.78rem', textTransform: 'uppercase', letterSpacing: '0.08em', color: '#df7657', fontWeight: 750 }}>Text to video</div>
      <h3 style={{ margin: '0.35rem 0 0.55rem', fontSize: '1.3rem' }}>Turn a motion idea into a vertical clip</h3>
      <p style={{ margin: '0 0 1rem', color: '#6e6861', fontSize: '0.95rem', lineHeight: 1.55 }}>Start with the finished motion you need. Include the subject, camera angle, repeated action, sensory details, and target aspect ratio.</p>

      <div style={{ display: 'grid', gridTemplateColumns: 'repeat(auto-fit, minmax(240px, 1fr))', gap: '1.25rem', alignItems: 'stretch' }}>
        <div style={{ height: '100%', padding: '0.85rem', borderRadius: '9px', background: '#f8f6f2', color: '#4d4640', fontSize: '0.86rem', lineHeight: 1.55 }}>
          <p style={{ margin: '0 0 0.65rem', color: '#8a8178', fontWeight: 700 }}>Ask Happycapy</p>
          <code style={{ whiteSpace: 'pre-wrap' }}>Close-up shot of a hand pressing keys one by one on a keyboard made of assorted cookies and candies.{"\n\n"}Each time a fingertip lands, the corresponding cookie keycap slightly depresses, then quickly springs back up, making a crisp "click-clack, click-clack" sound that combines the crunchy texture of biscuits with the sharp tactile feedback of a mechanical keyboard.{"\n\n"}The fingers keep pressing different keycaps in a smooth, continuous motion with a steady rhythm. Vertical video, 9:16 aspect ratio.</code>
        </div>

        <div style={{ height: '100%', justifySelf: 'center', width: 'min(100%, 240px)', display: 'flex' }}>
          <video controls muted playsInline preload="metadata" poster="/images/features/cookie-keyboard-video-poster.jpg" style={{ display: 'block', width: '100%', aspectRatio: '9 / 16', objectFit: 'cover', margin: 0, borderRadius: '12px', border: '1px solid rgba(46, 41, 41, 0.1)', boxShadow: '0 18px 40px rgba(46, 41, 41, 0.08)' }}>
            <source src="https://mintcdn.com/happycapy/3Agk_CtGKKqauJRe/images/features/cookie-keyboard-video.mp4?fit=max&auto=format&n=3Agk_CtGKKqauJRe&q=85&s=06f85a9977ebd9fef79696830bacb24f" type="video/mp4" data-path="images/features/cookie-keyboard-video.mp4" />

            Your browser does not support the video tag.
          </video>
        </div>
      </div>
    </div>
  </div>
</div>

### 2. Start from images

Upload images when you want more control over the first frame, last frame, subject, product, character, or visual style.

<div style={{ display: 'grid', gridTemplateColumns: 'repeat(auto-fit, minmax(250px, 1fr))', gap: '1rem', margin: '1rem 0 2rem' }}>
  <div style={{ gridColumn: '1 / -1', border: '1px solid rgba(46, 41, 41, 0.1)', borderRadius: '12px', overflow: 'hidden', background: '#fffdf9' }}>
    <div style={{ padding: '1.1rem' }}>
      <div style={{ fontSize: '0.78rem', textTransform: 'uppercase', letterSpacing: '0.08em', color: '#df7657', fontWeight: 750 }}>Image to video</div>
      <h3 style={{ margin: '0.35rem 0 0.55rem', fontSize: '1.3rem' }}>Animate a product from reference images</h3>
      <p style={{ margin: '0 0 1rem', color: '#6e6861', fontSize: '0.95rem', lineHeight: 1.55 }}>Tell Happycapy what each image should control. A start frame sets the opening, an end frame sets the destination, and reference images guide identity, materials, or style.</p>

      <div style={{ display: 'grid', gridTemplateColumns: 'repeat(auto-fit, minmax(170px, 1fr))', gap: '0.75rem', marginBottom: '1rem' }}>
        <div style={{ padding: '0.85rem', borderRadius: '10px', background: '#f8f6f2', border: '1px solid rgba(46, 41, 41, 0.08)' }}>
          <div style={{ color: '#df7657', fontSize: '0.78rem', fontWeight: 750, textTransform: 'uppercase', letterSpacing: '0.08em' }}>Start frame</div>
          <p style={{ margin: '0.35rem 0 0', color: '#4d4640', fontSize: '0.88rem', lineHeight: 1.45 }}>The first visible moment.</p>
        </div>

        <div style={{ padding: '0.85rem', borderRadius: '10px', background: '#f8f6f2', border: '1px solid rgba(46, 41, 41, 0.08)' }}>
          <div style={{ color: '#df7657', fontSize: '0.78rem', fontWeight: 750, textTransform: 'uppercase', letterSpacing: '0.08em' }}>End frame</div>
          <p style={{ margin: '0.35rem 0 0', color: '#4d4640', fontSize: '0.88rem', lineHeight: 1.45 }}>The final pose, layout, or reveal.</p>
        </div>

        <div style={{ padding: '0.85rem', borderRadius: '10px', background: '#f8f6f2', border: '1px solid rgba(46, 41, 41, 0.08)' }}>
          <div style={{ color: '#df7657', fontSize: '0.78rem', fontWeight: 750, textTransform: 'uppercase', letterSpacing: '0.08em' }}>Reference image</div>
          <p style={{ margin: '0.35rem 0 0', color: '#4d4640', fontSize: '0.88rem', lineHeight: 1.45 }}>The product, character, brand, or mood.</p>
        </div>
      </div>

      <div style={{ display: 'grid', gridTemplateColumns: 'repeat(auto-fit, minmax(260px, 1fr))', gap: '1.25rem', alignItems: 'start', marginBottom: '1rem' }}>
        <div>
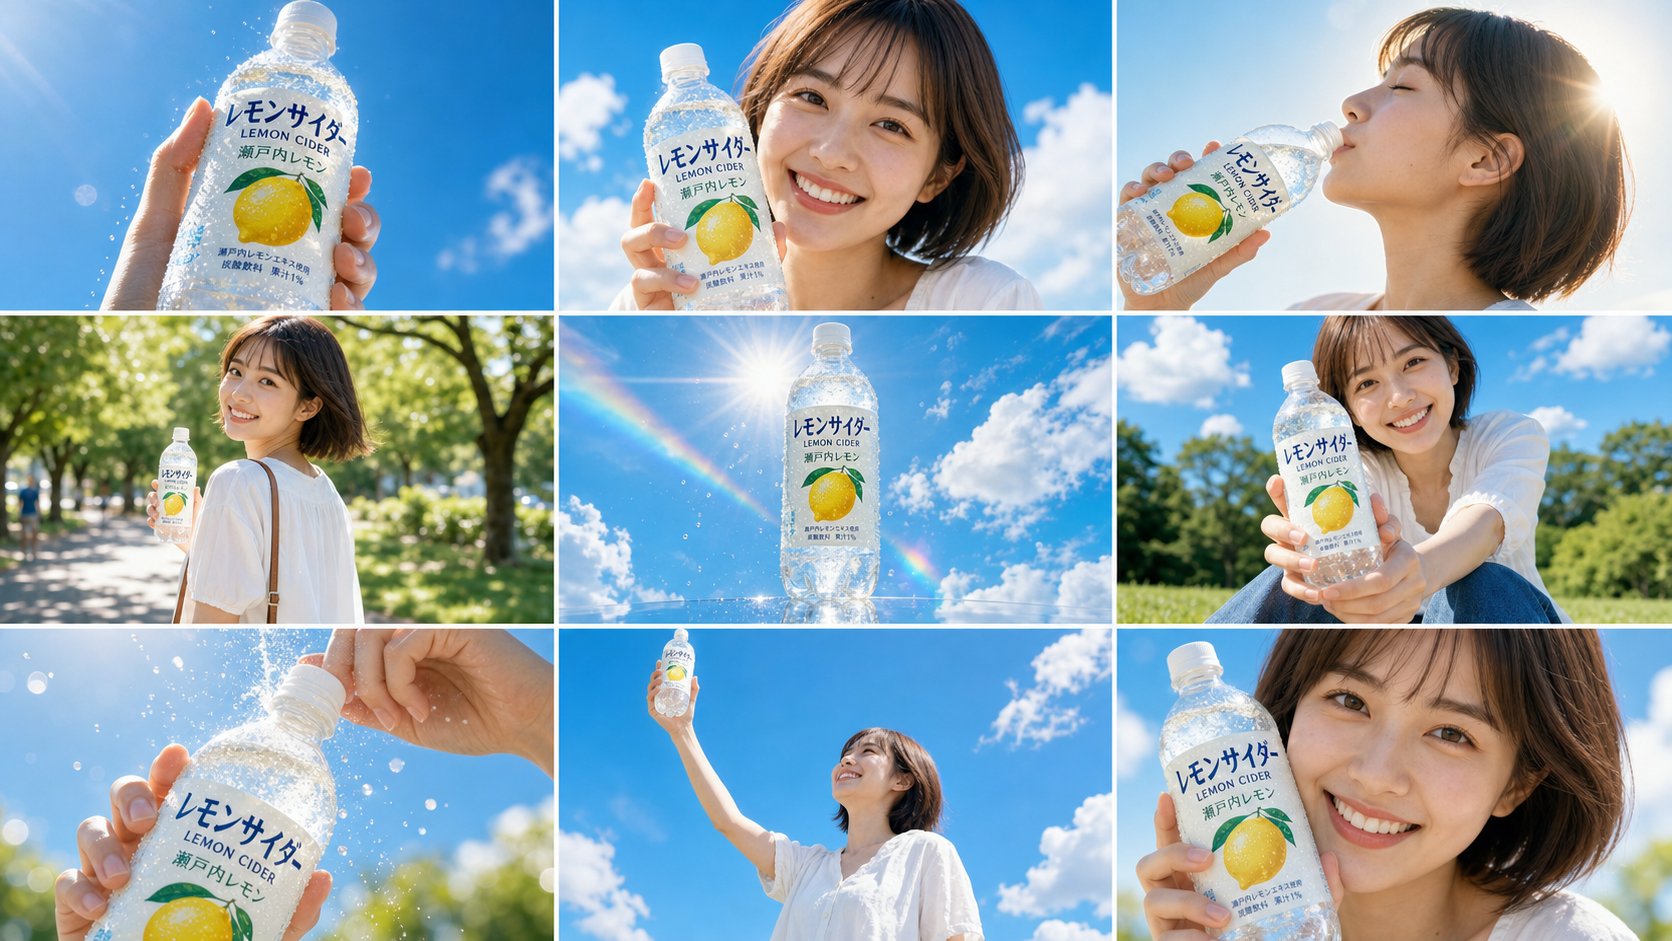
          <img src="https://mintcdn.com/happycapy/3Agk_CtGKKqauJRe/images/features/lemon-cider-storyboard.png?fit=max&auto=format&n=3Agk_CtGKKqauJRe&q=85&s=6a06f4a0528f02a54c2a065a6a04cacc" alt="Nine-panel lemon cider storyboard reference for an image-to-video ad" style={{ display: 'block', width: '100%', aspectRatio: '16 / 9', objectFit: 'cover', margin: 0, borderRadius: '12px', border: '1px solid rgba(46, 41, 41, 0.1)' }} width="1672" height="941" data-path="images/features/lemon-cider-storyboard.png" />

          <div style={{ marginTop: '0.45rem', color: '#8a8178', fontSize: '0.78rem', fontWeight: 700, textTransform: 'uppercase', letterSpacing: '0.08em' }}>Reference storyboard</div>
        </div>

        <div>
          <video controls muted playsInline preload="metadata" poster="/images/features/lemon-cider-video-poster.jpg" style={{ display: 'block', width: '100%', aspectRatio: '16 / 9', objectFit: 'cover', margin: 0, borderRadius: '12px', border: '1px solid rgba(46, 41, 41, 0.1)', boxShadow: '0 18px 40px rgba(46, 41, 41, 0.08)' }}>
            <source src="https://mintcdn.com/happycapy/3Agk_CtGKKqauJRe/images/features/lemon-cider-video.mp4?fit=max&auto=format&n=3Agk_CtGKKqauJRe&q=85&s=0f95c2f13c2da0ab5e41162291ccdf78" type="video/mp4" data-path="images/features/lemon-cider-video.mp4" />

            Your browser does not support the video tag.
          </video>

          <div style={{ marginTop: '0.45rem', color: '#df7657', fontSize: '0.78rem', fontWeight: 750, textTransform: 'uppercase', letterSpacing: '0.08em' }}>Generated video</div>
        </div>
      </div>

      <p style={{ margin: '0 0 1rem', color: '#6e6861', fontSize: '0.95rem', lineHeight: 1.55 }}>A storyboard can do two jobs at once: it anchors the product, character, and color palette, while also telling Happycapy the order of the shots.</p>

      <div style={{ padding: '0.85rem', borderRadius: '9px', background: '#f8f6f2', color: '#4d4640', fontSize: '0.86rem', lineHeight: 1.55 }}>
        <p style={{ margin: '0 0 0.65rem', color: '#8a8178', fontWeight: 700 }}>Ask Happycapy</p>
        <code style={{ whiteSpace: 'pre-wrap' }}>Use the attached 9-panel storyboard image as the visual reference and shot sequence guide for a 15-second lemon sparkling water advertisement.{"\n\n"}Keep the character, product label, color palette, bright summer lighting, and camera compositions close to the reference. Follow the panels from left to right, top to bottom. Add natural motion: bottle condensation, rising bubbles, hair moving in the breeze, slow sipping, sunlight flares, and a final close-up freeze frame.{"\n\n"}Use an airy Japanese summer commercial style with vivid sky blue, warm golden sunlight, shallow depth of field, and smooth handheld camera motion. Save the result as outputs/lemon-cider-ad.mp4.</code>
      </div>
    </div>
  </div>
</div>

<Accordion title="Full storyboard prompt">
  <div style={{ padding: '0.85rem', borderRadius: '9px', background: '#f8f6f2', color: '#4d4640', fontSize: '0.86rem', lineHeight: 1.55 }}>
    <code style={{ whiteSpace: 'pre-wrap' }}>Use the attached 9-panel storyboard image ([https://storage.res-capy.com/img-prompt/lemon-cider-ad.png](https://storage.res-capy.com/img-prompt/lemon-cider-ad.png)) as the visual reference and shot sequence guide for this advertisement video.{"\n\n"}The storyboard shows a cheerful Japanese young woman in a white outfit holding a transparent lemon sparkling water bottle ("レモンサイダー LEMON CIDER 瀬戸内レモン") against a bright blue summer sky. Reproduce the character's appearance, product design, color palette, and each shot composition faithfully from the reference.{"\n\n"}Follow the 9 panels in order as the scene sequence:{"\n\n"}Panel 1 (0:00-0:02): Animate the bottle being thrust toward camera, condensation droplets catching the light, bubbles rising inside the bottle.{"\n\n"}Panel 2 (0:02-0:04): The girl turns to face camera with a bright smile, her hair moves gently in the breeze, sunlight glints behind her.{"\n\n"}Panel 3 (0:04-0:06): She slowly tilts her head back to take a sip, eyes closing in satisfaction, a warm sunlight halo blooms around her silhouette.{"\n\n"}Panel 4 (0:06-0:08): She walks along the sun-drenched path, glances back over her shoulder with a playful smile, leaves shimmer in the background.{"\n\n"}Panel 5 (0:08-0:10): The bottle floats centered in frame against the deep blue sky, sunlight refracts through it creating a slow rainbow arc sweep.{"\n\n"}Panel 6 (0:10-0:11): She extends the bottle toward the viewer with both hands, leaning slightly forward with a warm inviting smile.{"\n\n"}Panel 7 (0:11-0:12): Extreme close-up: the bottle cap twists open in slow motion, fizz and bubbles burst upward backlit by golden sunlight.{"\n\n"}Panel 8 (0:12-0:13): She raises the bottle high above her head laughing freely, camera drifts upward to reveal the vast open blue sky.{"\n\n"}Panel 9 (0:13-0:15): She holds the bottle close to her face, looks softly into the camera with a genuine smile. Slow push in. Freeze on final frame.{"\n\n"}STYLE: Match the color grading in the reference exactly: overexposed highlights, airy whites, vivid sky blue, warm golden sunlight. Cinematic shallow depth of field. Smooth handheld camera motion with subtle drift. Slow motion on sip, fizz, and final freeze moments.</code>
  </div>
</Accordion>

### 3. Edit a video

Upload a clip when you already have footage and want Happycapy to create a new version, change the subject, adjust the action, or keep refining the same scene.

<div style={{ display: 'grid', gridTemplateColumns: 'repeat(auto-fit, minmax(250px, 1fr))', gap: '1rem', margin: '1rem 0 2rem' }}>
  <div style={{ gridColumn: '1 / -1', border: '1px solid rgba(46, 41, 41, 0.1)', borderRadius: '12px', overflow: 'hidden', background: '#fffdf9' }}>
    <div style={{ padding: '1.1rem' }}>
      <div style={{ fontSize: '0.78rem', textTransform: 'uppercase', letterSpacing: '0.08em', color: '#df7657', fontWeight: 750 }}>Video editing</div>
      <h3 style={{ margin: '0.35rem 0 0.55rem', fontSize: '1.3rem' }}>Edit what happens in an existing clip</h3>
      <p style={{ margin: '0 0 1rem', color: '#6e6861', fontSize: '0.95rem', lineHeight: 1.55 }}>Give Happycapy the source video and describe what should change. You can keep the original camera movement, room, lighting, and timing while changing the subject or action.</p>

      <div style={{ display: 'grid', gridTemplateColumns: 'repeat(auto-fit, minmax(220px, 1fr))', gap: '1.25rem', alignItems: 'start', marginBottom: '1rem' }}>
        <div>
          <video controls muted playsInline preload="metadata" poster="/images/features/video-edit-capy-cat-before-poster.jpg" style={{ display: 'block', width: '100%', aspectRatio: '9 / 16', objectFit: 'cover', margin: 0, borderRadius: '12px', border: '1px solid rgba(46, 41, 41, 0.1)' }}>
            <source src="https://mintcdn.com/happycapy/3Agk_CtGKKqauJRe/images/features/video-edit-capy-cat-before.mp4?fit=max&auto=format&n=3Agk_CtGKKqauJRe&q=85&s=ce7c9c1d7c2d6cfbafddeefcaef85cbb" type="video/mp4" data-path="images/features/video-edit-capy-cat-before.mp4" />

            Your browser does not support the video tag.
          </video>

          <div style={{ marginTop: '0.45rem', color: '#8a8178', fontSize: '0.78rem', fontWeight: 700, textTransform: 'uppercase', letterSpacing: '0.08em' }}>Before</div>
        </div>

        <div>
          <video controls muted playsInline preload="metadata" poster="/images/features/video-edit-capy-cat-after-poster.jpg" style={{ display: 'block', width: '100%', aspectRatio: '9 / 16', objectFit: 'cover', margin: 0, borderRadius: '12px', border: '1px solid rgba(46, 41, 41, 0.1)', boxShadow: '0 18px 40px rgba(46, 41, 41, 0.08)' }}>
            <source src="https://mintcdn.com/happycapy/3Agk_CtGKKqauJRe/images/features/video-edit-capy-cat-after.mp4?fit=max&auto=format&n=3Agk_CtGKKqauJRe&q=85&s=87a856a233ff5e6d93da7fd4e8a085c5" type="video/mp4" data-path="images/features/video-edit-capy-cat-after.mp4" />

            Your browser does not support the video tag.
          </video>

          <div style={{ marginTop: '0.45rem', color: '#df7657', fontSize: '0.78rem', fontWeight: 750, textTransform: 'uppercase', letterSpacing: '0.08em' }}>After</div>
        </div>
      </div>

      <div style={{ padding: '0.85rem', borderRadius: '9px', background: '#f8f6f2', color: '#4d4640', fontSize: '0.86rem', lineHeight: 1.55 }}>
        <p style={{ margin: '0 0 0.65rem', color: '#8a8178', fontWeight: 700 }}>Ask Happycapy</p>
        <code style={{ whiteSpace: 'pre-wrap' }}>Use the uploaded video as the source.{"\n\n"}Keep the original room, floor, desk legs, camera movement, lighting, and the cat's position. Add a capybara into the scene so it comes out from the laptop screen, lands naturally on the floor, and has a playful scuffle with the cat.{"\n\n"}Make the capybara match the perspective, scale, shadows, and handheld phone-video style. Keep the interaction energetic but not violent. Save the edited video as outputs/capybara-cat-edit.mp4.</code>
      </div>
    </div>
  </div>
</div>

## Keep iterating

After a video is generated, keep working in the same conversation. Ask Happycapy to make another version, adjust the motion, create a cover image, write a caption, or save the final files with clear names.

## Related resources

* [Image Creation & Editing](/en/features/image-generation): create still images, references, and cover assets.
* [Files](/en/features/files): find generated MP4s, cover images, and supporting files.
* [Credits & usage](/en/getting-started/credits): understand how media generation uses credits.
* [Generate a short video ad](/en/use-cases/short-video-ad): see a complete video ad workflow.